Cleaning Cedar Homes, Part I
Published August 2022
Editor’s Note: This is part one in a two-part series. In the September issue, Part II will address exceptions to the typical equipment and techniques, basic equipment and supplies, how to bill, problems to avoid, and how to fix mistakes.
G
eographical Considerations
When thinking of cedar-sided or log homes, you may imagine cabins on lakes in rural areas of the U.S. and Canada. However, cedar-clad or log homes are found in many regions of North America in both urban and rural settings.
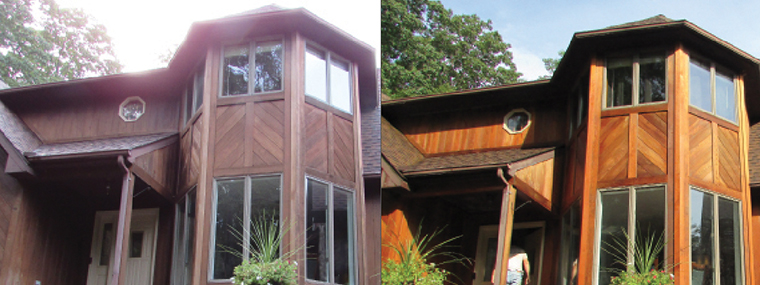
Cedar is a softwood species that is popular because it can last for decades—if properly maintained and installed. Cedar is naturally resistant to water damage, warping, bug and mildew infestation, and mold. While pine, spruce, hemlock, and other softwoods are commonly used in home construction, cedar provides a look that is unique in color and a grain pattern that sets itself apart from the rest.
One of the most beneficial aspects of cedar siding, however, is its durability. Depending on the local
weather conditions—with potential damage from rain, snow, and ultraviolet (UV) rays from the sun—homeowners usually need to restain their cedar homes every three to five years. This opens up a myriad of opportunities for power washing contractors. Given the correct weather conditions to perform the work, the job of cleaning and sealing a cedar home can be very rewarding.
Before you add cedar cleaning and restoration/sealing to your roster of contract cleaning services, know that this type of work should be done only by a contractor who possesses specific knowledge of cedar. (Training is available through PWNA, CETA, and equipment/chemical suppliers.)
Note: Removal of lead paint, which can be found on many older homes (especially those built prior to 1976), is not addressed in this article except to remind readers about the following:
- Test for lead, as required by the U.S. Environmental Protection Agency, and
- Never attempt to remove lead-based paint without first becoming certified by the proper authorities. (Learn more at https://www.epa.gov/lead/lead-laws-and-regulations)
Typical Job
The job of cleaning cedar homes begins with a site visit to look over the home to determine what needs to be done. There are unique conditions that contractors should factor into their bids.
Assess The Basics
What is the condition of the wood and coating? Is it bare and UV-damaged? Is there discoloration from sun or water exposure? Does it have an oil- or water-based coating applied? Is it stain or sealer? (“Stain” refers to a sealer with color added. “Coating” is referring to an aspect of the function of a sealer.) How easily can it be removed?
When testing for oil-based coatings, be aware of the volatile organic compounds (VOC) restrictions that vary by region. In the more highly restricted regions, oil-based products tend to be easy to scuff/scratch.
For water-based coatings, using alcohol as a solvent to bring the color out of the coating will indicate its properties. Other indicators are peeling, flaking, and “pops,” where the coating has “popped” off the surface, usually around cracks in the wood.
Hybrid coatings will have a superficial aspect to them which we associate with “film formers,” which indicates most of the product is on the surface and mostly the colorless constituents actually penetrate the substrate. Alcohol pads are a quick way to determine if this is the case.
Can the coating be maintained? This question addresses the condition of the product currently on the wood versus what comes out of the can. Coatings can color shift with exposure to the elements, and they may darken, which means what comes out of the can will not match what is on the surface. Testing by doing small cleaning spots can determine if the color has changed or if it is simply dirty. Another indicator is that the condition of the coating is intact. If there are numerous areas where the coating is missing, faded, or exhibits UV “burning” (grey/black) compared to other sides or
sheltered aspects of the home, then it cannot be maintained. It needs to be removed and reapplied.
Do you have reliable access to water, or do you need to bring a water truck? City water is dependable but well water isn’t. It’s best to bring a water truck to avoid unnecessary delays waiting for the well to replenish or the pressure tank in the basement to recharge, or risk of damage to the homeowner’s water system. A water truck is far less expensive and more reliable.
Also, note that the Clean Water Act (CWA) does not allow for any runoff into lakes, streams, rivers, etc. All wastewater must be captured and reclaimed and then disposed of at approved locations, which are rarely convenient to the location of work being performed.
Water reclamation isn’t always possible for a number of reasons. You may have had to turn down jobs where the home is less than 10 feet from a body of water, and you can’t capture the runoff or any of the splash generated during the operation. Replacement of siding is more cost effective at that point.
Consider the terrain/lay of the land. Is it level or sloped? Do trees, shrubs, garden beds, or other structures impede access? Many homeowners install their landscaping absent of any thought to maintenance or restoration. If it is determined that certain landscape features are within range of the workflow and could be damaged, it is important to inform the customer of the potential for such and, if possible, what efforts need to be taken to mitigate that damage.
Consider the height of ladders, lifts, and fall arrests. Ladders are usually required to do this type of work. Scaffolding may be required in other phases of the project, such as during replacement work, buffing/sanding/caulking, etc. Lifts are useful if there are components of a home that prevent other means of access from being possible or safe.
Metal roofs, for example, are a huge issue as they become ice rinks once wet. Fall arrest measures are expensive, and even then metal roofs might be treacherous for the technician to work upon. Lifts can provide a safer platform to conduct the work and allow for less need to penetrate the roof to install certain forms of cleats for the workers to ascend/descend upon when combined with fall arrest systems.
How easy/difficult is it to bring in your vehicles and equipment? This question will play a vital role in the planning and execution of the work as there are numerous obstacles to be considered on each project. The terrain is the primary one, including its ability to support heavy equipment or vehicles towing any equipment to the site. The locations of septic fields, wells, etc. must be known.
Other Considerations
What is the composition and condition of the roof?
Is there cedar trim (on chimneys, etc.) above the roofline? This is the most difficult to address when it comes to the pitch of the roof and getting a technician into position to perform the work. Fall arrest equipment and measures are paramount.
Overall condition of the home—Are there pre-existing conditions, such as peeling trim paint or rotting wood? How will they be handled? By your team? Or by using subcontractors? Clean a test spot—select a spot in the most challenging and inconspicuous area so that you can see what you are really up against.
Typical Equipment and Techniques That Work Best
All species of cedar are categorized as “soft wood” on the Janka hardness scale at 12 percent wood moisture content (WMC), which makes it more susceptible to damage than many other wood species.
What is the orientation of the siding? Vertical installation may last longer, but it is more difficult to clean than a horizontal finish. Chemicals tend to run off the vertical surface. If the finish is relatively intact, the runoff presents issues with the ability of chemicals to work properly in a shorter time. Temperatures and wind conditions may necessitate frequent re-application to keep the product active until it has sufficiently softened the coating.
If the existing finish is in good condition, a maintenance wash alone would be appropriate.
Not all manufacturers recommend the same maintenance cleaning methods for their products since many chemicals are harmful to coatings. Some products, for example, might require using a mixture of bleach and trisodium phosphate (TSP), while others require an acid-based cleaner. Applying a sealant/stain after the rinse and sufficient drying time is the next step.
PSI & Temperature: Never use hot water and high pressure to clean cedar. Warm water increases a cleaner’s solubility and effectiveness. The water temperature should be a maximum of 80ºF. The only nozzles you should use are the green (25-degree) or white (40-degree) tips.
Let the cleaners, brushes, dwell time, and agitation do the work. To achieve the best results, a pressure washer set at 1500 psi or lower is your rinsing tool. Spray nozzles with larger orifices reduce the psi, so use a nozzle conversion chart to select a nozzle that gives an optimal match.
Apply the cleaners by injection or a sprayer onto the side of the home and allow sufficient dwell time, keeping the surface wet with additional cleaner. Dwell time is the term used to indicate the time the product is active upon the surface applied. Note that dwell time may vary, according to the weather conditions, time of day, and other factors. Warmer temperatures and direct sun can shorten this as the product tends to dry out, which makes it enter a state of inactivity.
It is important to remember that cleaners are no longer active if they dry. To reactivate them, simply apply a mist of water to help reactivate a “solution” already applied that has dried on the surface. More of the solution may be required when the current application appears ineffective and/or dried out.
That said, there can be a benefit to product drying out as well. If the desired results have been achieved on certain areas, such as the horizontals (floors, steps, rail caps, etc.), then allowing the product to dry out while continuing to apply upon other areas that still need more dwell time is beneficial because the solution is not continually working over a prolonged period of time, which leads to fuzzing and degradation of the substrate. Agitate tough areas with a soft brush, not with your wand and pressure.
Rinse using a soap nozzle. If needed, reapply chemicals to areas requiring additional cleaning, and repeat the process.
Beth Borrego, VP, See Dirt Run!, Inc., has been a contributing freelance author for several publications, including Cleaner Times. She was active in the PWNA for many years and served two years on its board of directors; conducted seminars at conventions; has been an instructor for the Wood Restoration class, co-teaching with Rod; and has spoken at several round table events. Beth has also been a guest speaker several times for CETA. Realizing her vision for education in our industry, she launched The Grime Scene, an online BBS Forum for cleaning contractors.
Rod Rodriguez, President of See Dirt Run! Inc, started the company in 1999, combining a desire to own a business with the entry into an industry that would enable him to express his meticulous nature. Rodriguez has established high standards of excellence for his company. Having a desire to give back, Rod has also been an instructor for PWNA in their Wood Restoration classes. He personally trains all employees and manages all large projects. A skilled carpenter, Rodriguez makes beautiful custom cabinetry. He enjoys playing the guitar rambunctiously in his spare time.
Current Digital Issue
|
|
Click to read.
|


Go Mobile